
How to Roast Pumpkin Seeds: 5 Easy Steps to the Perfect Roasted Pumpkin Seeds

Don’t toss the seeds when you carve your jack-o’-lanterns this year! After more than a decade of roasting (and a few burnt batches), I’ve landed on 5 easy steps that make pumpkin seeds perfectly crispy every time, in the oven or the air fryer.

NOTE: This post contains some links to Amazon, which means that I make a small commission off items you purchase from Amazon at no additional cost to you. I appreciate your support!
Learn how to roast pumpkin seeds so they come out golden, crunchy, and full of flavour with these 5 simple steps. The real secret happens before they ever hit the oven: a good wash, a quick soak, and a short boil in salted water. Keep them classic with olive oil and sea salt, or try one of my sweet, spicy, and savory seasoning ideas below or experiment and have fun with pumpkin seasoning blends. Either way, they make a healthy, fibre-rich snack and a crunchy topping for your favourite fall salads and soups.
NOTE: This recipe was updated to include additional seasoning ideas and air fryer instructions.

In our house we have a tradition, every Halloween, when the kids carve their pumpkins they BEG me to roast pumpkin seeds for them. I whine about how long it takes, but eventually oblige them. Suffice it to say, I have been working on creating the recipe for the perfect roasted pumpkin seeds over the past 12 years. I have to admit that there have been some definite misses (as in I burned the absolute crap out of them the first few times I tried to make them). But with those misses have come some lessons learned.

How to roast pumpkin seeds so that they’re perfectly crispy:
I’ll let you in on a secret…. the perfect crispy roasted pumpkin seeds is not in the baking, instead it’s in the steps you take before the baking. Baking them slowly, and paying attention to them while they bake is also an important step, but these other steps can also make or break your seeds.

Step 1. Wash your seeds well
You really want to wash your pumpkin seeds well and discard all pumpkin fibres. Over the years, I’ve had a time or two when I got lazy and didn’t clean the seeds well enough; trust me, they really don’t turn out as well. So, grab your colander and clean them…and then clean them again and again.

Step 2. Soak your pumpkin seeds
This step allows any remaining pumpkin on the seeds to sink and the seeds to float, it’s like magic!

Step 3. Boil your pumpkin seeds for 10 minutes in salt water.
In my opinion, this is what helps make the pumpkin seeds easier to digest and produces the crispy outer shell during roasting. This also helps cook the insides of your pumpkin seeds so when you go to roast them you will get that perfect pumpkins seeds crunch ensuring the insides are cooked. Boiling with salt allows the salt to permeate your seeds but if you are short on time, you can skip this step and they will still turn out delicious.
Step 4. Season your pumpkin seeds

My preference is to season my seeds with olive oil, sea salt and a touch of garlic using McCormick’s Sea Salt Garlic Grinder, but there are many other ways you can season your seeds, such as:
- Classic Salted: Toss the seeds with olive oil and sea salt for a simple, satisfying flavor.
- Sweet and Spicy: Combine honey, cayenne pepper, and a pinch of cinnamon for a delightful blend of sweet and spicy.
- Garlic Parmesan: Mix the seeds with garlic powder and grated Parmesan cheese for a savory, cheesy twist.
- Pumpkin Spice: Create a fall-inspired flavor by using pumpkin spice (cinnamon, nutmeg, ginger, and cloves) along with a touch of brown sugar.
- Herb-Infused: Blend fresh or dried herbs like rosemary, thyme, and oregano with the seeds for an aromatic, earthy taste.
- Curry-Coated: Go for an exotic twist with curry powder, turmeric, and a hint of coconut oil.
- Lemon Zest: Add a burst of freshness by grating lemon zest over your roasted seeds.
Tip: experiment and find the flavor combinations that you and your family enjoy the most.
Step 5. Watch your pumpkin seeds while you bake them
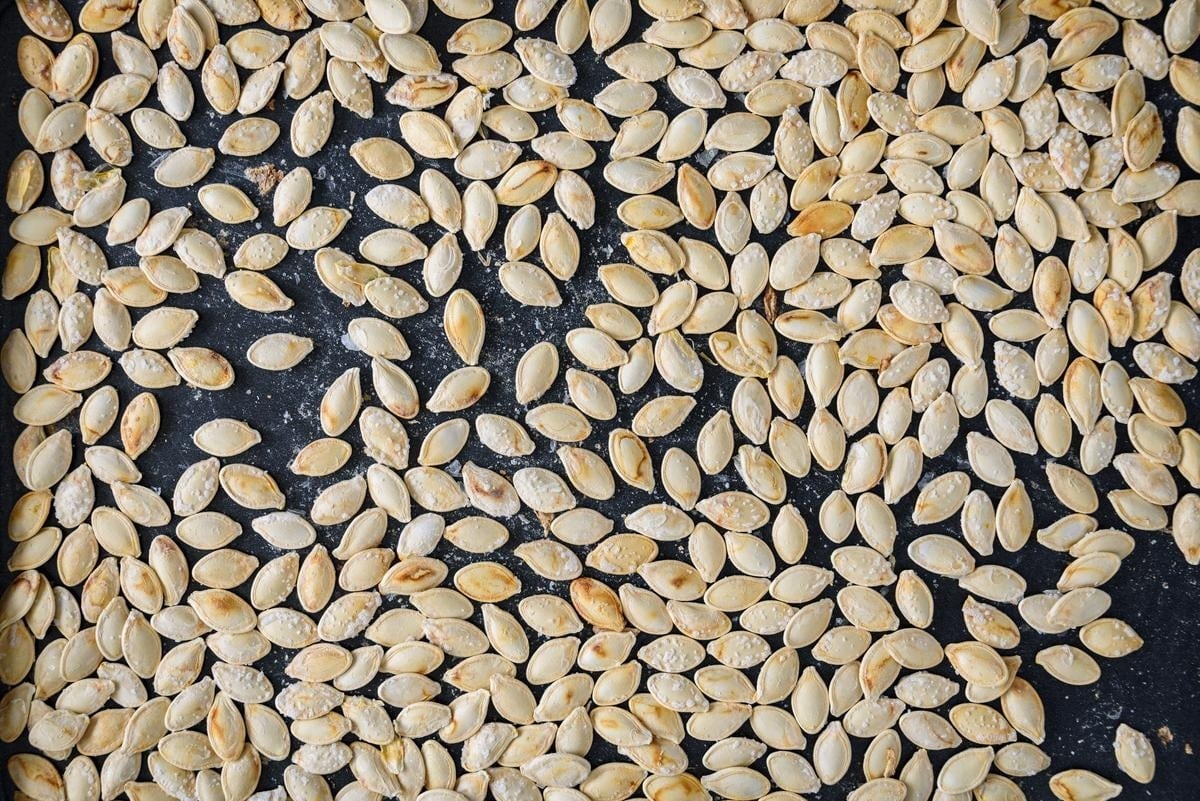
Oven Roasted Pumpkin Seeds
Preheat your oven to 325°F, then watch them as they roast. I’m really bad at getting sidetracked, so I set my kitchen timer for 10 minutes. This way, it will alert me and I can go in and move the pumpkin seeds around on the baking sheet. I repeat this every 8-10 minutes until they are done (about 20-30 minutes). I’m very serious about using the timer — there have been times when I didn’t do it and sure enough, I let them burn. Once they’re done, remove the roasted pumpkin seeds from the oven and let them cool on the baking sheet. This will help them crisp up further as they cool.
PRO TIP
Add sweet seasonings like honey or brown sugar in the last 5 to 10 minutes of roasting so they don’t burn. Add lemon zest after roasting.
Air Fryer Roasted Pumpkin Seeds
If an air fryer is more your thing, then you can pop the seeds in the air fryer after seasoning them at 350°F (175°C) for about 15-20 minutes, shaking the basket halfway through. Start checking the seeds after 10 minutes to ensure they don’t burn, and stir them a few times. When they appear ready, remove the basket from the air fryer and let the seeds cool slightly before eating. If they’re not crispy enough, just air fry them for another few minutes.
Enjoy your roasted pumpkin seeds as a healthy snack or use them as toppings for salads or soups. Remember, these times and temperatures are approximate, so you can adjust them slightly based on your preferences and your oven’s behavior. Happy roasting!

Frequently asked questions about roasting pumpkin seeds:
Can you eat pumpkin seed shells?
Yes! Pumpkin seeds, also known as pepitas, can be eaten with or without their shells. That said, people with digestive disorders should probably avoid pumpkin seed shells.
Are pumpkin seeds healthy?
Yes! Pumpkin seeds are a great source of magnesium, which plays a role in muscle and nerve function, and zinc, which supports your immune system. They also contain plant-based protein, iron, and healthy unsaturated fats. When you eat them whole with the shell on, you also get extra fiber, which helps keep you feeling full between meals. As with any nut or seed, a small handful goes a long way. If you’re watching your sodium, go easy on the salt and try one of the herb or spice seasonings instead.
How long do roasted pumpkin seeds last?
Let your seeds cool completely before storing them. Any leftover warmth creates moisture, and that makes them go soft. Store them in an airtight container or mason jar at room temperature for the best crunch and flavour, ideally within 1 to 2 weeks. For longer storage, keep them in the fridge for a few months or the freezer for up to a year. Because the seeds contain natural oils, give them a sniff before eating older batches. If they smell bitter or like old paint, they’ve gone rancid and should be tossed.
What is the ideal temperature and time for roasting pumpkin seeds?
325°F is the ideal temperature and the ideal time is 20-30 minutes.
Are pepitas the same as pumpkin seeds?
Not exactly. Pepitas are the green, hull-less seeds that come from certain pumpkin varieties that grow seeds without a tough outer shell. The seeds you scoop out of a jack-o’-lantern have a white shell, which you can eat whole once roasted. The green kernels sold in stores are usually either true pepitas or regular pumpkin seeds with the shells removed. Both are delicious, and both make a great crunchy topping for salads and soups.
Can I roast seeds from other squash?
Absolutely! Seeds from butternut, acorn, spaghetti, and delicata squash all roast beautifully using the same method. They’re usually smaller and thinner than pumpkin seeds, so shorten the boiling time to about 5 minutes and start checking them early in the oven. It’s a great way to use up the seeds from your fall squash all season long, not just on carving night.
Why are my roasted pumpkin seeds chewy?
Chewy seeds almost always come down to moisture. The usual culprits are seeds that weren’t dried well after boiling, bits of pumpkin pulp still stuck to them, or a crowded baking sheet that makes them steam instead of roast. Spread them out in a single layer with a little space between them, and let them cool completely on the pan before you judge the crunch. They crisp up a lot as they cool. If they’re still chewy once cool, pop them back in the oven for 5 minutes at a time until the shells snap easily when you bite them.
Do I need to dry pumpkin seeds before roasting?
Yes. This is one of the easiest ways to get crispier seeds. After boiling, drain the seeds and spread them out on a clean kitchen towel or paper towels, then pat them as dry as you can before tossing them with oil and seasoning. Wet seeds steam in the oven, and the oil and seasoning won’t stick as well. If you have the time, letting them air dry for 20 to 30 minutes is even better.
Do I have to boil pumpkin seeds before roasting them?
No, but I highly recommend it. Boiling the seeds in salted water seasons them all the way through and helps the insides cook evenly, so you get a crispy shell without a burnt kernel. If you’re short on time you can skip it and go straight to drying, seasoning, and roasting. Just keep a closer eye on them, since unboiled seeds can brown faster.

🍂 CELEBRATE FALL with
50+ Easy Salad Recipes for Fall
Fall is around the corner, and do you know what that means? It’s time to enjoy the fresh Fall produce with salad ideas that your whole family will love!
How to Roast Pumpkin Seeds Recipe

Equipment You’ll Need
Ingredients
- Seeds from 2 large pumpkins
- ½ teaspoon McCormick’s Garlic Sea Salt
- ½ tablespoon olive oil
- Dash of salt
Instructions
- Scrape out and remove seeds from your pumpkins. Wash and clean your seeds from your pumpkin, making sure you remove any unwanted pumpkin rinds or deformed seeds. Wash in a colander and once again remove any unwanted items.
- Soak the clean seeds in a bowl full of water for 1/2 hour on kitchen counter or overnight in the refrigerator. Drain the seeds, discarding the water.
- Preheat oven to 325F.
- Fill a pot with water and a dash of salt (enough water so that it will cover the seeds). Bring the water to a boil. Place seeds into the boiling water and boil gently for about 10 minutes.
- Turn off the heat and drain the seeds and place back into your empty bowl. Toss seeds with olive oil and sea salt. Lay out seeds in thin layer onto a cookie sheet lined with parchment paper.
- Roast seeds in your oven for 10 minutes. Remove from oven and stir. Roast for another 8-10 minutes (keep checking your seeds because the bake time can vary a lot depending on your oven!). During the last 5 minutes of roasting, remove a few seeds and crack open to make sure the inner seeds are not burning (you don’t want the inner seed brown). Cool a couple and pop them into your mouth to test. They are ready when the shell is super crispy and easy to bite through. The inner seed should have only a hint of golden tinge to it. They should not be brown.
- Season with additional salt if desired. Remove from oven and allow to cool. Place into a clean mason jar. Enjoy!
Notes
- Seasoning ideas:
I use olive oil and a garlic sea salt blend, but try garlic Parmesan, pumpkin spice, sweet and spicy, herb, curry, or lemon zest. See the seasoning ideas section above for how to make each one. - Air fryer method:
After seasoning, air fry at 350°F (175°C) for 15 to 20 minutes, shaking the basket every 5 minutes. Start checking at 10 minutes. Let cool slightly; they’ll crisp up more as they cool.
Nutrition
Disclosure
Recipes and photos are for your personal enjoyment only — please share the love by linking, not copying!SEARCH FOR RECIPES
More Halloween Party Food Recipes

Mummy Hot Dog Recipe
Every Halloween Party needs a silly Mummy – this Mummy Hot Dog Recipe is a fun kitchen food craft for the kids and will be a party favourite. Serve mummy dogs with spooky spider web sauce for the ultimate Halloween experience!

Easy Double Chocolate Halloween Bark » Salads for Lunch
This microwave Double Chocolate Halloween Bark recipe only takes minutes to make and is so easy that even your kids can make it. Use your imagination and make it as spooky as you want!

Pumpkin Trail Mix Muffins
Healthy and Delicious Pumpkin Trail Mix Muffins are a fun twist on a typical pumpkin muffin. The trail mix adds some great flavor and texture. ’Tis the season for everything pumpkin.
Join the conversation:
What’s your favourite seasoning for pumpkin seeds?


Silly question, but I will ask anyway.😁 you eat them in the shell? In the store, they are sold without. So I always thought you had to remove the shell and thought it would be too much work. You may have opened up a whole new world for me.😃
Yes! Pumpkin seed shells are safe for most people to eat. In fact, they add to the seeds’ distinctive crunch and provide more nutrients.
Great article. It is very useful and informative. Thanks a lot for sharing this post.
Really interesting. I’ve never heard about boiling pumpkin seeds. Do you have a clue how long can they last before they start to turn bad (talking about after being cooked)? I really want to make a lot and eat them for a month or two. Thanks.
At room temperature in an airtight container the seeds will last for up to three months but up to 12 months if you store them in an airtight container in the fridge.
I love roasted pumpkin seeds never knew about boiling them!